Welcome to my bonsai blog!


Welcome to my bonsai blog!

Look around! Use the Search box, browse the Archive, and leave comments. Click on any picture to enlarge it.
I would be honored to have you follow my posts. There are two ways to do that.
-- If you have your own blog, use Join this site
to have notifications of my posts sent to your blog's reading list.
-- If you don't have a blog,
use Follow by Email: new-post alerts will be sent to your email address. Pictures aren't included; that's just how Blogger does it. For the pictures you come here!
Fora and vendors that I can recommend from experience are listed in the right sidebar.
For more about the ads, and just why I enabled them, please see "About the ads," below.
"And the LORD God made ... trees that were pleasing to the eye ..." Gen. 2:9, New International Version.

"Bonsai isn't just something I do; it's part of what I am." Remark to my wife and daughter.

Thursday, April 23, 2020

From the Greatest to the Least

     The ponderosa featured in my last post is not only the largest of my pines, but with an estimated age closer to 50 years than 45, it is also the oldest and most mature.

Here is the youngest and the smallest. I haven't yet identified its species.
One year old. The trunk is about twice as thick as a pencil lead.

About a year ago, my wife accompanied our oldest daughter, who is a skilled semi-professional jeweller, on a rock-collecting trip to Arkansas. They had a fine time, finding plenty of interesting rocks and crystals, sharing a tent, and enjoying each other's company.

And our daughter noticed some pine seedlings, newly sprouted that spring. She's a competent gardener herself, and she brought some back. She gave one to me to see if I could eventually develop it into a bonsai. I potted it up in a small plastic tray (see the picture), using a fairly coarse mix.

By the end of the summer it had matured enough to start producing its needles in bundles - 3 to a bundle, never 2 or 4. That and the fact that the needles are naturally twisted have let me tentatively identify it as a loblolly pine, Pinus taeda. However, Arkansas has four native pine species, so I'm not going to say I'm sure of its species for another couple of years.

It spent the winter under triple-layer shelter, directly on the ground, with my half-hardy specimens. If it is a loblolly, it won't be cold-hardy much below 10 degrees F (-12 C) in a pot, if it is even that cold-resistant. It came thru this winter fine, so the protection it was given must have been adequate. It is now acclimating to the open air. Its terminal buds are elongating and will soon open.
This year's candles getting ready to open.
I suspect the yellow spots on the needles are needle rust, so I've treated the tree with Cleary's 3336F, a systemic fungicide. I will also consult a more experienced pine grower.

I may not live to see this tree developed into a creditable bonsai - loblollies can live well over 200 years. But I'll try to follow Colin Lewis' advice to us older geezers in such a case: "Do it right for posterity!"

Stay tuned for more on my little "gift pine"!

:-)  :-)  :-)

Tuesday, April 14, 2020

Repotting That Ponderosa

     In my last post, I mentioned the yamadori ponderosa that I intended to repot the following day.

I bought this Pinus ponderosa from Andy Smith of Golden Arrow Bonsai last summer. Andy collected it in 2017, and estimated it to be 40 years old at the time of collection. In August 2019 he brought the tree with him when he visited Fort Wayne to lead a B.Y.O.T. workshop (saving me shipping costs, which I much appreciated.) We did the first styling in that workshop. Here are a few pictures.

My new ponderosa as Andy delivered it.
The work in progress.
(The cluttered background in this picture is due to an unavoidable camera angle.)
Finished for the day. You can see Andy Smith in the background, in the blue cap.
The tree spent the winter outdoors but sheltered from the wind, and by early this month the buds were swelling noticeably. However, temperatures were swinging up and down like a roller coaster, with daytime highs often above freezing but nightly lows frequently below. I finally got an almost week-long stretch of mild weather, and before the foliage opened too far for repotting to be safe this spring. Thankful for the opportunity, I went ahead.

Here's the tree before work began. I anticipated that I might have to adjust the planting angle once I saw the nebari. Also, some topmost branches had gotten disarranged when I finagled the tree into my car after the workshop last August.
April 7, 2020. Ready to repot.
The pot, a gift from my friend Dave Burke, is an unglazed ceramic rectangle. An aeration layer of scoria, particles between 6 and 7½ mm in size, is ready in the bottom.
This pot is a little shorter and a little narrower, but also a little deeper, than the pot the tree came in. Volumes are similar.
I've mentioned before, usually to the surprise of friends in this country, that pines and their close relatives are exotic to me. I grew up in the tropics, and tropical rainforest trees are my "default" models, all the way down to my subconscious, of what to expect from trees and shrubs. I've killed more pines and spruces over the years than I care to mention, as I've slowly learned the specifics of how they differ from tropicals and just how they should be handled as a result.

I've learned a lot of those specifics in recent years from Ryan Neil and the Bonsai Mirai live streams. (Unlike me, Ryan grew up surrounded by pines, if I understand correctly.) For one thing, it's finally gotten thru my head that a conifer should be never be fully bare-rooted when repotting. Never. Just halfway. I tried two of Ryan's techniques which I hadn't used before, the first of which has to do with that "bare-rooting only halfway": I carefully removed about half the existing potting mix from a "window" in the approximate center of the root mass and more or less under the base of the tree. Here's a picture from below; you can see light coming thru some gaps between structural roots (red arrows).
The "window" in the original soil mass.
(Ryan Neil refers to the area immediately under the base of a tree as its sin - pronounced "sheen" and only coincidentally written in our alphabet the way it is! He says a healthy root mass in the sin is very important to the tree's long-term health, but I don't yet fully understand why.)

I also used Ryan's anchoring approach - the second of his techniques I tried for the first time - using stainless-steel wire and small wood screws. I think the results were good, but I have no pictures.

As I mentioned in my last post, I decided to use his 1:1:1 mix of  akadama, pumice and scoria; all particles were between 2 and 6 mm. That's a smaller average particle size than Ryan uses for ponderosas, but his location gets 52 inches of rain per year to my 40, so I'm not especially concerned. Also, the new pot is not especially shallow, a factor that helps drainage. Mycorrhizal inoculant was sprinkled over the roots before soil was filled in.
For any who don't recognize them, the pumice is white, the scoria is black and the akadama is tan.
A large back root, which could not be removed now without endangering the tree, forced me to pot the tree farther forward in the pot than I intend it to eventually be. That root will be shortened at the next repotting, when I replace the outer "donut" of soil and leave the sin untouched. I will then also be able to adjust the front a little (clockwise as seen from above). A top dressing of shredded sphagnum finished things off.
That root adds interest, but constrains the planting position. Guy wire is a precaution.
And that's all for this year. I'll fertilize the tree well, adjust some branches next year, and repot again in 2021.
The tree in its new home.
Well, almost all: the spring weather wasn't quite done with me and the tree yet. Tonite our low is forecast to again be below freezing and the cold is supposed to stay around for the next three days. Even a ponderosa's roots shouldn't be exposed to such chill right after repotting. So the tree is now on the ground next to the south wall of our garage, under the overhang of the roof, screened from the prevailing wind, and with the pot and its contents swaddled in a fabric made for cold protection of early-season vegetables.
Tucked in until the weekend.
Ciao for now!

:-)  :-)  :-)
Tuesday, April 7, 2020

Learning More About Akadama

Hard akadama, maximum particle size about 5 mm.
          Since my first blog post about akadama two years ago, I think I can safely say that my understanding of the subject has become a little more nuanced. In particular, I've learned more about akadama use in a climate like mine: temperate, freezing temperatures in winter, 40 inches of precipitation in an average year. (And in spring, a tendency to go from shirtsleeves to sleet within 24 hours!)

In my last post I mentioned that Andrea Wigert and Adam Lavigne, both in Florida, told me that they don't use akadama in their respective planting mixes because it stays too wet in their rainy climate. I decided to seek the input of a bonsai professional in a climate a lot more like mine. So I contacted a man from whom I've already learned a lot, Mark Fields, of Bonsai by Fields LLC in Indianapolis.

I particularly wondered if Mark uses akadama in his planting mix for ponderosa pine (Pinus ponderosa). I have a yamadori ponderosa from Golden Arrow Bonsai that is due for repotting this spring. Ryan Neil, of Bonsai Mirai, recommends akadama very highly, and I had the components to duplicate his ponderosa mix, a 1:1:1 blend of akadama, pumice and scoria. But first, I wanted to get the thoughts of an experienced grower closer to home. A big "Thank you!" to Mark for discussing the question with me in a series of emails. ðŸ˜„

Here is what Mark told me.
  • First, he uses akadama or an akadama blend for everything except ponderosa pines and California junipers. For those species, he substitutes a product called calidama. As I understand it, calidama is a fired-clay product which absorbs water very slowly and releases it very slowly.
  • Mark allows his temperate-zone trees to freeze over the winter, in a cold greenhouse. It's been his experience that akadama goes into winter still holding enough water that, once it freezes, the particles at the surface, exposed to the air, disintegrate into dust by spring. He didn't say so, but I presume that with a dryland species like ponderosa, Mark doesn't want to take a chance on that dust building up over time and clogging the pores of the soil. With other species, he simply tilts the pots up in the spring and brushes off the dust.
  • Akadama particles below the surface, in Mark's observation, retain their structural integrity.

My climate, here in what many call "Michiana", is both a little colder and a little drier than Mark's in Indianapolis. But after reading of the freezing-and-crumbling, I had almost concluded that I had best not use Ryan Neil's ponderosa mix, which is one-third akadama, but devise something myself.

Then I got an unexpected chance to ask Ryan directly whether he has ever had the problem Mark described: that of akadama on the surface freezing and crumbling. (His location does get freezing temperatures in winter.) He answered that he hasn't, and attributes that fact to the use of a top dressing of shredded sphagnum, which acts as a bit of a blanket over the surface particles.
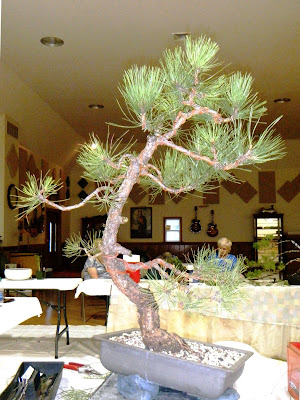
July 24, 2019, after first styling ; provisional front.

So - with great respect for Mark Fields, and great appreciation for his helpfulness and input - I have decided to use Ryan's recipe, that 1:1:1 mix of akadama, scoria and pumice. I admit I made the decision with some trepidation! And if the tree should suffer as a result, the responsibility is of course mine alone.

Repotting is set for tomorrow morning, once the anticipated rain clears out. The tree is ready, the mix is ready, the pot is ready, and I'm ready. I'll let you all know how it goes in a future post. Here's the tree, after first styling in a workshop with Andy Smith last summer.

(To see my earlier post about akadama, click here.)

:-)  :-)  :-)