Welcome to my bonsai blog!


Welcome to my bonsai blog!

Look around! Use the Search box, browse the Archive, and leave comments. Click on any picture to enlarge it.
I would be honored to have you follow my posts. There are two ways to do that.
-- If you have your own blog, use Join this site
to have notifications of my posts sent to your blog's reading list.
-- If you don't have a blog,
use Follow by Email: new-post alerts will be sent to your email address. Pictures aren't included; that's just how Blogger does it. For the pictures you come here!
Fora and vendors that I can recommend from experience are listed in the right sidebar.
For more about the ads, and just why I enabled them, please see "About the ads," below.
"And the LORD God made ... trees that were pleasing to the eye ..." Gen. 2:9, New International Version.

"Bonsai isn't just something I do; it's part of what I am." Remark to my wife and daughter.

Sunday, January 24, 2016

More Aerial Roots!

     I said in my last post that if a tropical-bonsai grower wants an aerial root in a given place, he or she usually has to hope the tree will throw one at that point. I was happily surprised a few weeks ago when one of my willow-leaf figs (Ficus salicaria) decided to do almost exactly that.

And then a week or so later, I discovered that my veldt fig (Ficus burtt-davyi) had followed the willow-leaf's example!

This mame F. burtt-davyi is one of my favorite bonsai. Pot by Sara Rayner.
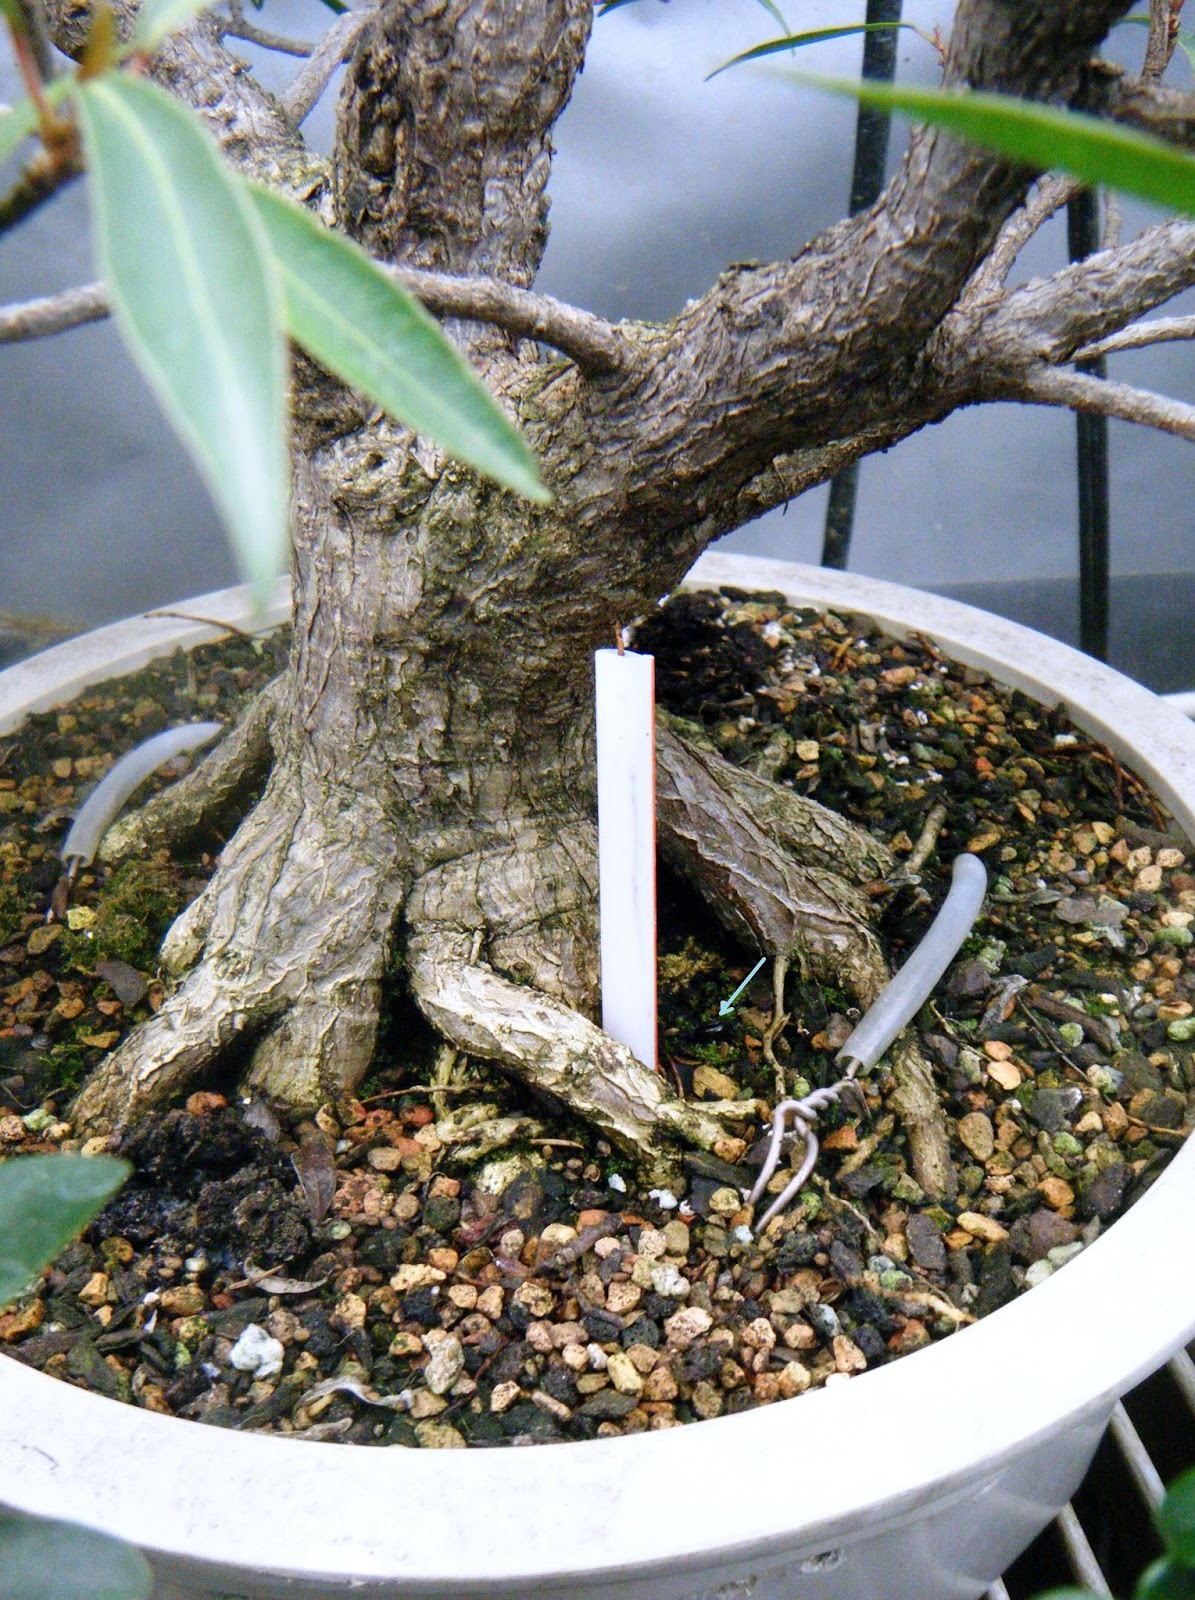
 The orange arrow points to the root that got a response of "Yes! Where I want one!" (Or words to that effect.) I've been hoping for an aerial there for several years. I want an aerial root on this tree for the tropical look, but just one because of the tree's size. And I want it where it's readily seen, but won't compete visually with the hollow trunk. This root's placement is perfect!

I was ready to use another, older aerial (blue arrow) if necessary. I would have grafted that root to the back of the lowest branch, at the branch base, approximately where the new root is emerging. Once the graft took, I would have removed the upper section, between the graft point and the root's initiation point in the canopy. Now I won't have to do that.

Here's a closer look.

The paper-clip hook (green arrow) is there to keep an older root from crossing the end of the new aerial.
Forgive this tree's mildly disheveled look: I'm getting it cleaned up for repotting in the near future.

Meanwhile, the willow-leaf fig about which I wrote in my last post has produced the beginnings of a couple more aerials!

Besides shade and high humidity, plenty of fertilizer seems to be a requirement for initiating new aerial roots.

The blue arrow points to an emerging initiation point. Below it you can see the root I wrote about in my last post, now matured enough to have the straw removed. (You remove a straw from a new aerial the same way you defuse a bomb - very carefully.)

Some aerial roots fail, and sometimes without apparent reason. The yellow arrow above points to another aerial that got started, but was already in trouble when the picture was taken. Five days later, it has withered completely.

Since I don't want this new one to fail, I cut a new length of drinking straw to protect and guide it. This tree's size and intended design allow for more than one aerial in that area.

The point where each aerial enters the soil can be adjusted at future repottings. Once an aerial root lignifies,
it can be wired and positioned like a branch.
On the opposite side of this tree's trunk (red arrow below,) another root-initiation point has appeared. (We need a a less cumbersome term for such point. Any ideas?) I'd like to see this one develop successfully as well, so am going to give it a drinking-straw cover too.

If, like me, you endured acne as a teenager, you'll understand when I say I'm reminded of a pimple!

When I saw this picture, I thought perhaps yet another root initiation point was showing up, out on a major branch (green arrow.) But no joy there: the "bump" turned out to be nothing more than a scrap of loose bark.

I should mention that there is another way to get an aerial root at just the point you want it: graft in a seedling or rooted cutting. That takes longer, but provided the graft takes well and without much swelling, it works. I plan to use that method on a Ficus microcarpa this summer, and I'll post pictures when I do. 

Meanwhile, the tropical  trees will be in the Crate for at least two more months. Who knows how many more aerial roots may appear before spring? 

:-)  :-)  :-)

Monday, January 4, 2016

Aerial Roots, Drinking Straws and Snails

     The winter conditions that my tropical trees have in the Crate are of course different from summer conditions outdoors. The two biggest differences are that the light is less intense, tho still adequate for growth; and I keep the humidity a good deal higher. Both those factors encourage aerial roots.

If there is a consistently reliable way to induce a tree to throw an aerial root at a particular point, I don't know what it is. As a rule, the tree initiates a new aerial root somewhere that seems good to it, and the grower has to be ready to encourage and protect the ones that happen to appear where the human wants them!

For any who may not know, one common way to protect a new aerial while it extends down to the soil is to place a piece of drinking straw where the root can follow it down. This maintains high humidity right around the root and serves as a warning to the grower: "Caution! Don't bump!" Since aerial roots are very fragile until they anchor and start to lignify, such reminders are very useful.

A couple of weeks ago one of my willow-leaf figs (Ficus salicaria) initiated a new aerial root very close to a point where I'd been hoping for one. I positioned a piece of drinking straw to protect and guide it, and after a few days noticed that the growing root (which has now reached the soil surface) is visible thru the plastic. I decided to take a few pictures tonite.

The aerial root shows as a somewhat indistinct dark line.

You'll notice a light-blue arrow to the right of the straw. That points to a snail; more on it in a moment.

A closer view of root, straw and snail. You can see the root's initiation point just above
the top of the straw.
This is the fifth snail of this species that I've found around the roots of this willow-leaf within the last two weeks. Snails also find the high humidity and less-intense light in the Crate congenial. But since they feed on living plant tissue as well as dead, I remove them.

This species' shells are about the same diameter as the drinking straw from McDonald's;
less than 1/4-inch (around 6 mm.)

While I disposed of another (sixth) snail I noticed, this one poked out its head and started for home. I don't know how it knew which direction to go. Perhaps it could smell the tree; perhaps it sensed the humidity in the substrate; perhaps it detected the shadows among the roots. I'm afraid it didn't get very far.

It actually looks rather elegant, all in black. But not elegant enough.

:-)  :-)  :-)