Welcome to my bonsai blog!


Welcome to my bonsai blog!

Look around! Use the Search box, browse the Archive, and leave comments. Click on any picture to enlarge it.
I would be honored to have you follow my posts. There are two ways to do that.
-- If you have your own blog, use Join this site
to have notifications of my posts sent to your blog's reading list.
-- If you don't have a blog,
use Follow by Email: new-post alerts will be sent to your email address. Pictures aren't included; that's just how Blogger does it. For the pictures you come here!
Fora and vendors that I can recommend from experience are listed in the right sidebar.
For more about the ads, and just why I enabled them, please see "About the ads," below.
"And the LORD God made ... trees that were pleasing to the eye ..." Gen. 2:9, New International Version.

"Bonsai isn't just something I do; it's part of what I am." Remark to my wife and daughter.

Wednesday, December 19, 2018

A New Kind of Training Pot

     At least, it's new to me. And it's also new in the sense of being different from other training pots - different enough to be granted a patent. The pot is made in Austria by an outfit called "Kristen & Zahalka", possibly the patent holders. I bought mine online from Stone Lantern, a vendor I consider worthy of repeat business. (More on both a bit later.)

The manufacturer simply calls it a "tie pot." One look at a picture and you see why: those knobs all around the outside rim are made to be anchor points for guy wires.

A "tie pot" for bonsai-in-training.
Guy wires can be very useful for stabilizing a tree while its roots re-establish themselves after repotting. This is especially true with cascade-style trees, whether semi- or full-, because their weight can be seriously one-sided. Sometimes anchor wires from below simply aren't enough, or in the right position, to keep the tree at the planting angle you want while it re-anchors itself. I have a semi-cascade 'Tigerbark' fig (Ficus microcarpa 'Tigerbark') of which this is true: if it's not guy-wired from the side after a repotting, its lopsided weight will topple it right out of position (and sometimes out of the pot!)

Guy wires can also be useful when shaping a bonsai-in-training. Sometimes a guy wire can pull a branch into position as effectively as wrapped wire. It can be left in place for years without danger of significant scarring, a consideration useful with trees that take a long time to set in a new position, such as ponderosa pine. And if a guy wire is thin it is much less noticeable than wrapped wire if the tree is displayed. 

Close-up of the anchor knobs.
The knobs are sturdy: when my pot arrived I tested them with my fingers, and they aren't going anywhere. That's important because, whether a guy wire is used for anchoring or for shaping, it goes without saying that a reliable anchor point is essential. There are 18 knobs around the circumference of the pot, spaced about two inches apart (roughly five centimeters.)

The whole pot is sturdy, made from high-impact plastic. I tried flexing the pot wall between my hands, using a good deal of force, and it would just barely flex. In normal bonsai use it won't flex. This matters because if a pot wall flexes, the soil mass inside it gets flexed; that means that the roots inside the soil get flexed, and that means broken feeder roots, because roots aren't made to flex like branches are.

These pots are also designed to promote air-puning, another worthy feature. For any who don't know, "air-pruning" is the term for what happens when a root grows out into the open air. The exposed root tip dries out and dies, and the plant seals it off. Then the part of the root still in the soil branches to the sides, and voilĂ , you are that much closer to a compact, well-branched root system close to the trunk. And because the old root tip is sealed off rather than cut or broken, there is no break in the root's surface thru which pathogens can enter.

I'm sure most of my readers know what a plant's roots look like when it's been grown in a standard round, smooth-walled nursery pot. The roots grow out horizontally until they hit the wall of the pot; then they grow down to the bottom. Then, once they can go no deeper, they start to circle round and round at the bottom of the pot. The result can look like a clump of long-strand spaghetti!

These pots break that sequence with a system of internal low ridges to stop the circling, and holes to guide the root tips out of the pot for air-pruning. Take a look at the next two pictures:

Internal ridges to guide roots down to holes to the outside.
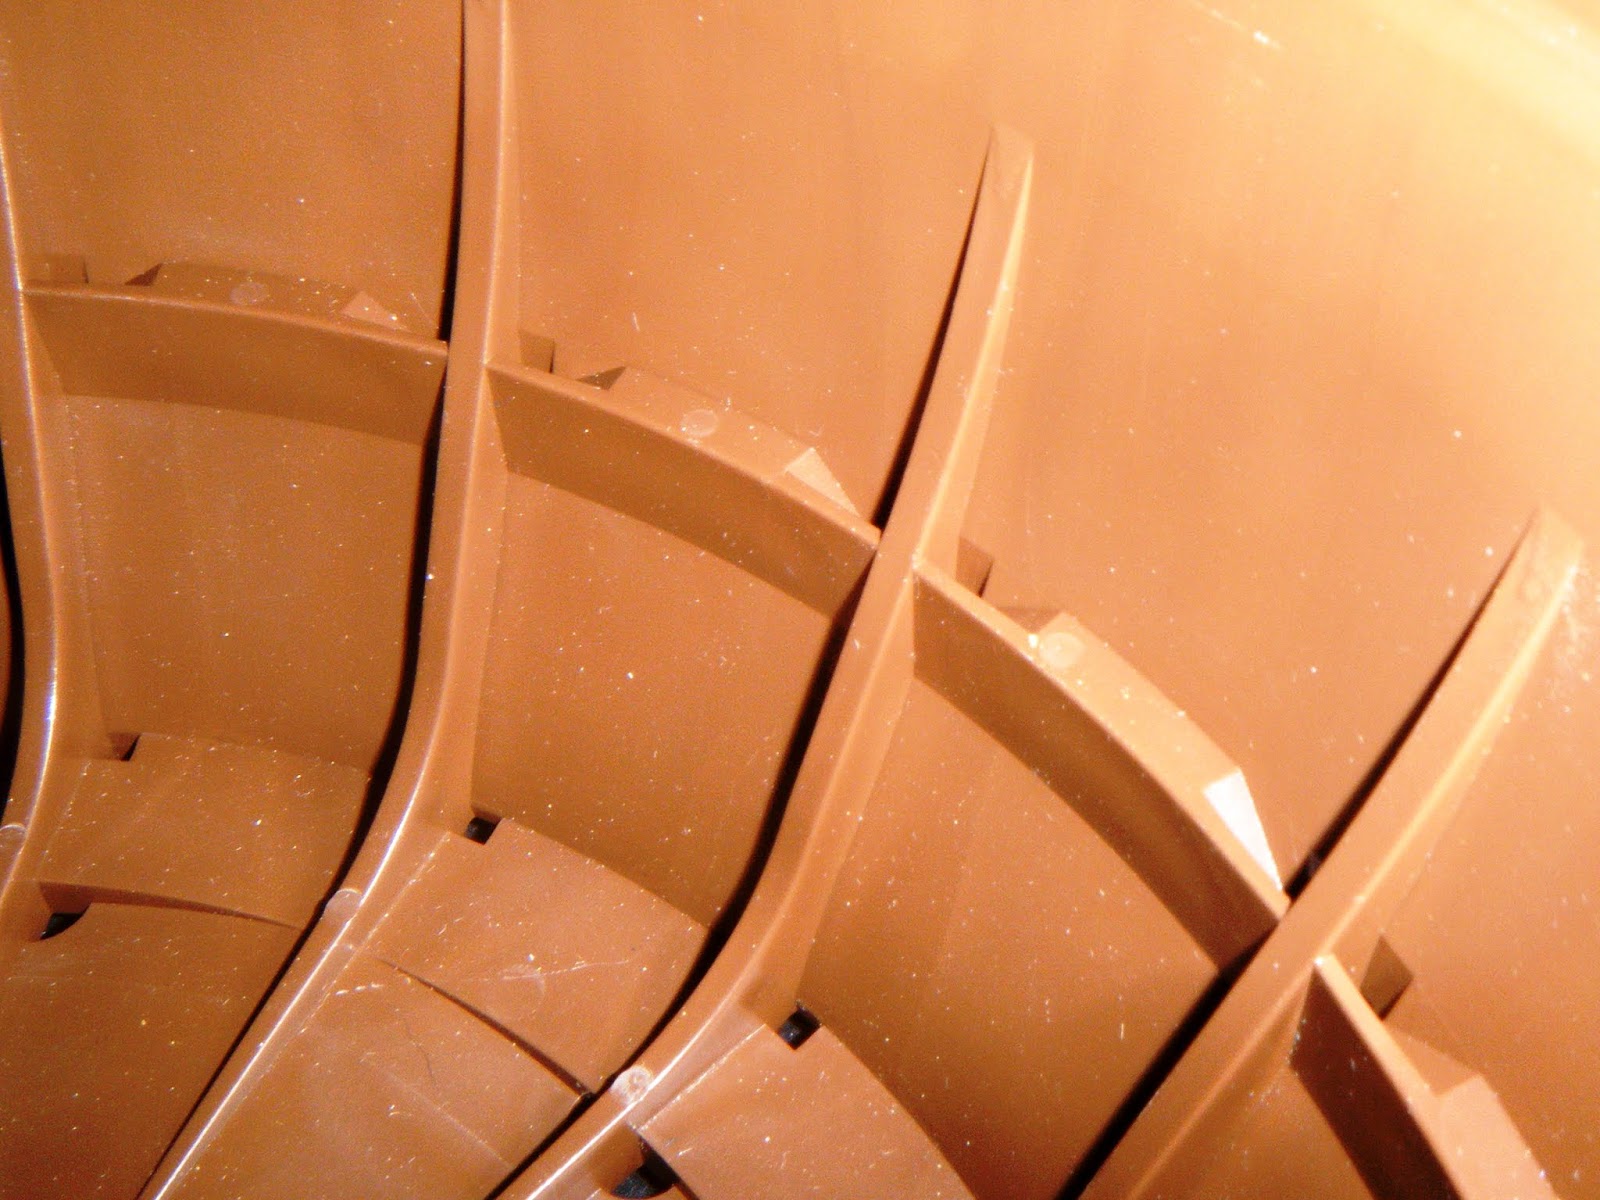
A closer look at the system of ridges and holes
Notice the narrow shelf running around the inside of the pot, about two inches above the pot floor. Notice that wherever that shelf is intersected by a ridge, there's a little ramp on either side, leading down like a funnel. Those "funnels" guide the rootlets to openings to the outside, as the next picture shows.

Root tips that enter the side holes (previous picture) emerge from these downward-facing openings.

Forgive the blurriness of the next picture, but I don't have a better one. I held the pot up to the early-evening sky to show just how many holes the bottom of the pot contains. All those holes give root tips access to the outside air. The eight largest holes that form an inner ring should also serve adequately for drainage. They are each only about a half-inch across, but there are eight of them.

A view against the sky to show all the holes!
I haven't yet had my hands on both the pot and my tape measure at the same time, but I can say the pot's diameter is very close to 8 inches at the bottom and 12 inches at the rim. Internal depth is about 4 inches. I estimate it will hold between one and one-and-one-half US gallons (roughly 3½ to 5 liters). Here's a picture with a standard 12-ounce beverage can right in the center.

12-oz. beverage can for a size reference
Stone Lantern is one of those vendors that I recommend in the sidebar; for their website, click here. Wayne Schoech and his crew sell a wide range of bonsai-related supplies, and I've never been dissatisfied with anything I've bought from them. For the English version of the tie pot manufacturer's website, click here. They sell other pots besides.

Obviously I have yet to grow anything in my new pot, but I expect it to live up to the claims about it. And I believe I have an appropriate candidate for its first occupant: this dwarf yaupon holly (Ilex vomitoria 'Schilling') that I got last summer in a workshop with Adam Lavigne of "Adam's Art and Bonsai." If any of tree of mine will need guy wires to keep it stable after repotting, this will be one. Look at that hollowed and twisted lower trunk!

Dwarf yaupon holly, first in line to spend a year or two in the tie pot.
Give me a couple of years and I'll write a follow-up post on my experience with my new container.

:-)  :-)  :-)


Monday, November 19, 2018

Call It A "Teaching Demonstration" on Wiring

     I could almost title this post, "Learning some things in spite of a mistake." The mistake I refer to was my own. I'll get to the reason I could say that, in a little bit.

If you're like me, wiring is one bonsai technique that is often more challenging than most others. Explanations and demonstrations can only teach so much: in the end, one has to buckle down and practice until one can do it right without conscious thought. But without explanations and demonstrations beforehand, practice is pointless. My old trumpet teacher used to say: 'Practice doesn't make perfect, practice makes permanent.'" (Thanks, Dick Whitmire.)

The Fort Wayne Bonsai Club has enjoyed an influx of new members recently. For their benefit, and because we old-timers can always learn more, we invited Mark Fields, owner of Bonsai by Fields LLC in Indianapolis, to teach a session on wiring at our November meeting yesterday. Because it was my idea and I've known Mark for a number of years, I was the one who made the arrangements.

Mark Fields has been interested in bonsai since the age of 9, when he asked a neighboring nursery owner why the man had weights hanging on the branches of some mugo pines. Over the ensuing half-century he has developed his skills studying with multiple teachers in the USA, Europe, and Japan, served as an officer in a number of bonsai organizations - he is currently President of the American Bonsai Society - and taught and given demonstrations in too many venues to name here. For more about his bonsai career, click here.

Since we weren't interested in an all-day workshop, I asked Mark to fit an explanation of theory - why wire in the first place, basic principles, alternative shaping methods, and so on - and some supervised practice time for our members into our usual two-hour time slot. As matters unfolded, I felt a growing sense of blunder: four hours would barely have been enough time to do what I asked and do it well! (In my defense, I can only plead abysmal ignorance of the full scope of what I was asking. Now I know.)

But Mark did his best, and he still gave us a session worth anyone's Saturday morning. The club recently received five fairly large potted pines as a gift from a local nursery, Blue River Nursery. Four of them will best go in someone's landscape, but the fifth, a lodgepole pine (Pinus contorta 'Spaan's Dwarf'), has definite bonsai potential, and was selected for what followed. 

(Please forgive the quality of some of the pictures. I have no better one of the tree chosen for the work.)

The five gift pines from the Blue River Nursery, Columbia City. The one chosen for the work is at the far end of the row.

Mark Fields assessing the tree chosen for the morning's session.
Mark's best and most natural teaching mode (it appears to me) is not lecture, but to teach and explain as he works. So we lifted that lodgepole pine onto a table in the garage of club co-president Pat Guido, and gathered around. Mark started working and talking, explaining the whys and wherefores of wiring as he went along, stopping sometimes to answer questions or expand on a point he had just made. All the time the first shaping of a pine bonsai was beginning under his hands.

Mark explains a point while he works, as Bob Mortenson and Bruce Kennedy watch carefully. 

He was assisted by his son Lincoln, whose interest in bonsai started at an even earlier age than his father's. Lincoln has already shown some of his bonsai in various venues, including the Indiana State Fair and last year's MABA convention. Besides being his dad's gofer and tool-finder, he created a jin on a branch stub his father indicated, and then suggested a shari leading from the jin down to the soil line. Mark looked at the spot, thought for a minute, and then concurred; Lincoln went to work.

His work on the jin finished, Lincoln starts carving the shari that his father approved.
As it turned out, and using the term I suggested in this post's title, the morning might best be called a "teaching demonstration." Mark wired and shaped the pine's first major branch, including its secondaries. As he did so, he demonstrated and explained a number of the important concepts of wiring, including selecting the proper thickness of wire for a given branch, anchoring, transitioning to a smaller gauge, wire position at a bend, and other aspects.

There was no time for supervised practice as I had envisioned - again, four hours would barely have been enough. Even so, the session served its purpose: I think even the most experienced members learned something about wiring that was new to them. I heard a number of comments along the lines of "This is so helpful," "I'm learning a lot," and at least one "This is great!" Our sincere thanks to Mark and Lincoln!

Mark's nursery is only about 2½ hours' drive from Fort Wayne, and he will soon resume his practice of holding open workshops on Saturdays. Our people are already talking about a field trip to Bonsai by Fields next spring or summer.

Last picture is of one new thing I learned: when it's actually OK to cross wires!

Red arrow: it's acceptable to cross wires when one secures the end of the other.

:-)  :-)  :-)


Monday, June 11, 2018

A Tweak to the Greenhouse

     A couple of months ago, I set up a small greenhouse to moderate conditions for my hardy trees. (Here's that post.) After the weather finally decided that spring was really here after all, the greenhouse became a suitable temporary home for my tropical trees while my hardy trees went onto (also temporary) racks elsewhere. I'm planning an outdoor bonsai enclosure on our new property, but so far other matters involved in our move have been more urgent.

The tropicals are still in the greenhouse, and temperatures have gone fairly quickly from spring to summer. The greenhouse was not designed with any sort of vent in the rear wall; it just came with the door in the front and two vents low on each side. And I discovered that on hot days the temperature inside could get over 100 degrees F (38 degrees C) by early afternoon. While many tropicals can survive such heat without permanent harm, it's not necessarily best for them.

So this weekend I made my own vent in the back end of the greenhouse. I put it as high as I practically could, since hot air rises, and made it large enough, I hope, to let heat out at an adequate rate. Dimensions are 5 inches by 22 inches (about 12½ cm by 56cm.)

The new rear-wall vent, open. Looking thru to the grass in front of the greenhouse.
A layer of plastic window screen on the inside will cut down on the amount of leaves and debris that blow in. The vent is held open or closed, as needed, with Velcro. I got pieces of industrial-strength Velcro (or so it's advertised, at least) of different widths at a local DIY store, and stuck them to one another and the plastic of the wall in such a way that nothing else was needed.

The vent closed. (Yes, the whole greenhouse sits on the ground at a few degrees of tilt.)
My father was a fairly good amateur engineer. That's one aptitude of his I did not inherit. Almost anything I build or contrive looks homemade; but it also usually does the job it's designed for, and I'll accept that!

:-)  :-)  :-)

Friday, June 1, 2018

A Little Pine Surprise

     I've never had one of my potted pines produce seed cones before. I've seen pollen cones on my yamadori ponderosas (Pinus ponderosa) a couple of times, including this spring. I'm glad to see them because, besides being visually interesting, they indicate that the tree is at least in reasonably good health.

But if that's not a seed cone developing on a branch tip of my yamadori ponderosa, I don't know what else it can be. It looks like a cone, just smaller and less developed than it will eventually be. And even tho it's not usually the dominant color, there is purple in the color of ponderosa bark.

I first noticed this new cone a little over a week ago, and got pretty excited - even dragged my wife over to see it the other day. It's something new, and I take it as even more a sign of the tree's good health than the pollen cones a few weeks ago.

First seed cone on my yamadori ponderosa. Presently about as long as my index fingernail.
As if to say, "Hey, don't leave me out," one of my Japanese black pines (Pinus thunbergii) also appears to be setting a cone for the first time! It's smaller (which may mean younger), a little different in form, and more of a pale pink in color at this point. But I've little doubt of what it is, and I'm excited to see it too!

New cone on one of my JBP's. Almost exactly in the center of the picture.
Besides being at a certain minimum level of health, a tree has to reach a certain stage of maturity as well before it can produce seeds. According to what I can find, a ponderosa has to be at least seven years old to set seed and a Japanese black at least four. Since this ponderosa is close to 45 years old and this JBP at least 12, they're both easily old enough! 

I'll post updates a time or two as the season progresses. From what I read, a ponderosa's cones take two year to mature, so the updates will continue next summer. I hope you enjoy this with me!

:-)  :-)  :-)

Sunday, May 20, 2018

Mr. Toad Comes to the Festival

     Fort Wayne, Indiana, has sister-city arrangements with several cities in other countries, including Takaoka, Japan. The annual Cherry Blossom Festival is one element in Fort Wayne's ongoing efforts to acquaint its people with things Japanese. And the Fort Wayne Bonsai Club has a presence at the Festival each year, displaying trees, selling bonsai-related items, and answering questions about the art of bonsai.

This year an unexpected visitor came close to stealing the show at our display. Early in the afternoon a girl of maybe six peered into the depths of Ed Hake's Japanese maple forest, turned to an adult with her and asked, "Is that toad real?"

Unbeknownst to Ed, a live toad had found its way into the middle of his forest planting. It backed about two-thirds of its body under the moss cover and then settled down, presumably to wait in ambush for passing juicy bugs.

Sitting motionless in Ed Hake's maple forest.
A number of people peered in to see the amphibian, then went away and returned with friends to have them see it too. No one disturbed it. It continued to wait there quietly, the unplanned show-crasher.

Ed took it home, in the forest, at the end of the day - his home likely being where the toad had found its way in among the maples in the first place.

:-)  :-)  :-)

Monday, March 26, 2018

Winter to Spring and Back in 24 Hours ...

     ... over, and over, and over again. So it has been for much of the last several weeks. Days with highs above freezing followed by nights with lows below freezing, one after another, are almost starting to feel like "the new normal!"

This weather pattern has been playing merry hob with my temperate-zone trees' spring responses. My American larch is typical, I think: Normally, from first green to full bud burst takes about a week, in my observation. But the first green - bud break - appeared several weeks ago, and as yet none of the buds have opened enough for individual needles to be distinguishable! I can't help but be concerned that this abnormally extended pattern of freeze-and-thaw will do some injury to new and still-tender foliage.

In an effort to buffer conditions for my cold-hardy trees, I decided to put up a small inexpensive greenhouse to hold them until temperatures are no longer doing their winter-to-spring-to-winter dance. My wife came across this product on-line; it measures 7 feet by 10 feet (a shade over 2 meters by an even smaller shade over 3), assembles in a couple of hours, and costs less than $80 US. I plan to keep it to use in future years as a temporary spring shelter for newly-repotted trees. 

Temporary plastic greenhouse to moderate temperatures for temperate-zone trees.
We recently moved, and our new location is windier than I expected. The tie-down equipment that came with this greenhouse is as inexpensive as the rest of it - OK, it's cheap. And a little story Ryan Neil told in a Mirai Live stream some weeks ago wouldn't leave my mind.

Every spring, Ryan and Masahiko Kimura's other apprentices would put up a temporary greenhouse on the premises. Part of the process was to tie it down with lots of heavy ropes. The first time Ryan Neil was involved in wrestling with the ropes, he turned to another apprentice after a while and asked, "Why are we doing this?" The answer went something like this:

"Well, ten years ago, this greenhouse took off. It was a windy day, and the whole thing lifted off the ground, sailed the length of Kimura's property - high enough to miss the bonsai there - and took out that second-story window on the far side of the street." (End of questions.)

Rather than provide a mini-sequel to Ryan Neil's story, I decided to add my own tie-downs to what came with my little greenhouse. My anchors are dog-tethering stakes - the kind with a business end like a spiral auger - and I used 3/16" nylon twine (almost 6 mm). My measures seem to be adequate: the wind picked up this afternoon while I was moving the trees into the interior, and while the plastic cover flexed and snapped and the tubular frame flexed slightly, everything stayed in place.

A closer view of the tie-downs. I decided on the Lilliputian approach: more thin ties instead of fewer thick ones.
(Think of Lemuel Gulliver immobilized on the beach by dozens of thread-fine ropes.)
The greenhouse is unheated. The trees' containers are resting on a single layer of landscape fabric on top of the soil, so get a bit of heat seeping up from the earth. The greenhouse itself will block the wind, and will reduce heat loss at nite by a few degrees, I expect. I put a min-max thermometer inside so I can monitor the temperatures.

Here are the trees inside, ready for the door to be rolled down and zipped shut for the nite.

The greenhouse holds all my hardy trees, with the exception of my largest, a Thuja occidentalis, a.k.a. American arborvita.
It's as cold-hardy as a musk ox, tho, so I could safely leave it outside on the sheltered side of the greenhouse.
:-)  :-)  :-)

Sunday, March 11, 2018

Six-Year Bonsai-from-Seed Competition

     A friend of mine once remarked that for some people bonsai is a pastime, while for others it is a passion. If a six-year bonsai contest won't show who's passionate about the art of bonsai, I don't know what will! That's what the Bonsai Nut forum recently launched: a competition to see who can grow the most bonsai-worthy Japanese black pine (Pinus thunbergii) from seed over six full growing seasons.

The contest started January 1st, 2018. Contestants could acquire seeds and get their supplies ready before that date, but nothing more. The contest will close at 11:59 PM on December 31st, 2023.

I find pines a bit fascinating, maybe because I rarely saw them while growing up in Ecuador. So I decided to jump in. I had received some JBP seeds (along with some Japanese maple and trident maple seeds) several years ago as a freebie for ordering a certain minimum amount at one time from Dallas Bonsai, and still had them.
The packet of Japanese black pine seeds, 'Sanshu' variety, imported from Japan. 
There were 30 seeds in the packet. After 24 hours soaking in (initially) warm water, all but one had sunk to the bottom of the cut-down styrofoam cup.
JBP seeds starting to soak.
After they finished soaking, I spread them between two sections of paper towel and wrapped damp sphagnum around paper towel and seeds. Everything went into a polyethylene bag, which was labeled and placed in the refrigerator. My wife and daughter were told they were there, to make sure the bundle wasn't mistaken for sauerkraut gone bad or something equally repulsive to their sensitivities, and discarded! 
The "remove" date was also noted on Google Calendar.
Three days ago, after 60 days of cold stratification, I took the seeds out and planted them. I decided to use peat pellets, the ones that expand into fat little barrel shapes when wetted. One seed went into each expanded pellet.
30 seeds, ready for planting. I don't know if the blue-green spot on one seed
on the left is mold on the seed itself, or something that was in the sphagnum.
Planted and ready. The "envelopes" around the peat pellets are biodegradable. 
Humidity covers in place. These "micro-greenhouses" will be easy to move whenever necessary.

It remains to be seen how many of the seeds are viable; they sat on the shelf for at least three years before being planted, maybe longer. But I've never heard that the seeds of any pine have short viability periods, so I think I have reason to be hopeful.

And speaking of hopeful: after entering the contest, I told my wife, "Now I have to live to at least 71 years old, in order to win this contest!"

If you would like to check out the Bonsai Nut forum, follow this link.

:-)  :-)  :-)

Wednesday, February 7, 2018

"What's so special about akadama, anyway?"

     If you're like me, you've wondered that more than once. Articles in bonsai magazines, professionals giving talks, bonsai blogs and websites, all urge us to use akadama in our potting mixes. And testimonials back up the claim that our trees’ root systems will thank us if we do. But akadama is expensive (partly because outside of Japan it must be imported.) Is it worth the cost?


"Double Red Line," one brand of akadama.
There are others available as well.
I had the chance to find out just what it is that makes akadama different, and so good for plant roots, in a recent live-stream broadcast from Bonsai Mirai.  In a word, it’s the structure.

Akadamatsuchi, in Japanese, means “red ball earth.” Akadama, the soil-mix component, is a clay product, dried but not fired. (Despite what a label sometimes says.) Like all unfired clays, it has a good cation exchange capacity, or CEC. For any unfamiliar with the term, the essential thing to remember about CEC is that the higher a substance’s CEC, the more nutrients, in usable form, it can hold on its surface where plant roots can get at them.

But there’s more to akadama than that. Almost all clays, the world over, are composed of microscopic plates. The structure is not very flexible, and when particles swell and shrink due to wetting and drying, they tend to fracture along the plate boundaries. This results in a greater and greater number of smaller and smaller particles in a given volume, and that means an exponential increase in total surface area within that volume of clay. More surface area means more water is held. But because of the plate structure of most clays, the total air space within that volume does not increase along with the water retention. The result: soggy soil.


Mining akadama in Japan.
Akadama is mined in one small area on Honshu, the Japanese main island. There, a particular combination of soil minerals and heat from subsurface volcanic activity come together to produce a clay with a structure based on tiny tubes rather than tiny plates.

To borrow Ryan Neil’s imagery: imagine a game of pick-up-sticks, where every stick is a narrow tube. Toss the tubes and they come down in a disorganized pile, with individual tubes running every which way. Now pick up your pile of randomly-oriented tubes and squeeze out the spaces between the outer walls of the tubes. What you end up with looks like an (oversized) akadama particle.

The tiny tubes – tubules – are still large enough for the smallest root hairs to grow into their water-vapor-rich and nutrient-rich interiors. Once a root hair does that, it keeps growing until it fractures the tube from the inside, and fractures the particle. The two smaller particles created by the fracture each have their own tubule systems, and new root hairs emerging from the sides of the original root hair (now becoming a rootlet) grow into them. They grow thru them, grow large enough to fracture them, and their side-emerging root hairs start to colonize the new, smaller particles that result – and the process goes on and on. Air spaces are getting smaller at the same time, but the root hairs being produced in growing abundance are still small enough to make use of them.

The result of all this is a compact mass of densely-branched, thriving roots – just what is needed for healthy, vigorous bonsai!

Not all the akadama on the market is of the same quality. Given what akadama costs in many places, it’s a good idea to check the quality of a batch before you buy. Ryan Neil’s suggestion: look at how much dust is in the bottom of the bag. If there’s very little dust, it’s good akadama. If there’s a lot of dust – move on.

And not every plant species thrives in akadama. Common juniper, Juniperus communis, grows thruout the northern hemisphere’s temperate and cold zones, and can make a very good bonsai (especially if obtained as yamadori.) But it should never be potted in akadama: for reasons no one yet knows, akadama is the kiss of death to common juniper.

Sooner or later, the supply of akadama is likely to be exhausted, and it costs more than many hobbyists care to pay anyway. What can be used as a substitute? Diatomaceous earth (horticultural grade) has a CEC almost as high as that of akadama, and a somewhat similar tube-based structure. Ryan Neil is experimenting with it in his potting mixes, and others are as well. I’m looking for sources willing to sell it in small quantities. (No success so far.)

Is Japanese akadama unique on the planet? Not quite, it turns out. Ryan Neil told a little story: He sent a bag of akadama to a soil scientist at a California university, asking for a full analysis. After running all his tests, the scientist told Ryan that there is one other place on earth (just one) where the mix of minerals and the level of volcanic heat are such as to produce an identical clay: Mt. Hood, Oregon. A local bonsai practitioner then went up to Mt. Hood, dug out some local clay, and sent it to the same scientist for analysis. The result: there was no difference between that clay and Japanese akadama, none.

Hoodah thunkitt? 

(You can watch the Bonsai Mirai stream “Soils” for yourself, free, at this link. Ryan covers more than just akadama.)


:-)  :-)  :-)

Saturday, January 6, 2018

"Budget" Doesn't Have to Mean "Uninteresting"

     Many of us are practicing bonsai on a budget. There are different reasons. Maybe our budget will only stretch so far. Maybe other pursuits are higher in our personal priorities than bonsai. (I'll forgive you.) Maybe we don't want to spend a lot on bonsai material until our skills improve.

Many in the bonsai world are familiar with the name of Jerry Meislik, retired ophthalmologist, long-time bonsai artist and teacher, and author of the book Ficus: The Exotic Bonsai. Jerry now has many splendid trees, trees to make any bonsai enthusiast drool, but that wasn't always the case. In a Facebook comment a few weeks ago, he said, "I still remember well lamenting the fact that I could not find material to create fantastic huge-trunk bonsai, and the material I could find and afford was pathetic." [Emphasis added.]

He went on to say, "Now I know that some really nice stuff can be made if one is willing to go with certain styles of bonsai."

Earlier that day Jerry had posted a composite picture of some of his recent creations, saying, "Many bonsai lovers have difficulty since their only material is young and long, and not showing huge bases and [an aged] appearance. For some years I have been working with young, long and uninteresting  material. I think you can do the same thing and create some fun bonsai."

Here are some of the pictures from the composite, full-sized and used with permission. For a sense of scale, it looks to me as if all but the third are resting on an upright piece of standard 4" x 4" lumber (approximately 10 cm x 10 cm).

All photos by Jerry Meislik. No commercial use without permission.
Some of the trees were recently defoliated, which allows more of their structure to be seen. While the trees show different styles (semi-cascade, slanting, etc.), most also show the bunjin (literati) variation.

All the bonsai in the pictures are Ficus, grown from cuttings from Jerry's larger trees, but there are other species and genera that can be used for the same purpose. Among tropical species, parrot's-beak (Gmelina), bougainvillea and schefflera are quite flexible when young. The same is true, if not to quite the same degree, for some temperate species, particularly in the pine family (Pinaceae): pine, spruce, hemlock and others. In addition, young and thin stock of almost any species can  be used for multi-trunk and forest plantings.

So, as Jerry's pictures demonstrate: if you are willing to work within certain limits of size, style and species, there is nothing to stop you from creating eye-pleasing, personally satisfying bonsai!

(With thanks to Jerry Meislik for putting this idea in my head. To visit Jerry's website, click here.)


:-)  :-)  :-)