Welcome to my bonsai blog!


Welcome to my bonsai blog!

Look around! Use the Search box, browse the Archive, and leave comments. Click on any picture to enlarge it.
I would be honored to have you follow my posts. There are two ways to do that.
-- If you have your own blog, use Join this site
to have notifications of my posts sent to your blog's reading list.
-- If you don't have a blog,
use Follow by Email: new-post alerts will be sent to your email address. Pictures aren't included; that's just how Blogger does it. For the pictures you come here!
Fora and vendors that I can recommend from experience are listed in the right sidebar.
For more about the ads, and just why I enabled them, please see "About the ads," below.
"And the LORD God made ... trees that were pleasing to the eye ..." Gen. 2:9, New International Version.

"Bonsai isn't just something I do; it's part of what I am." Remark to my wife and daughter.

Sunday, January 24, 2016

More Aerial Roots!

     I said in my last post that if a tropical-bonsai grower wants an aerial root in a given place, he or she usually has to hope the tree will throw one at that point. I was happily surprised a few weeks ago when one of my willow-leaf figs (Ficus salicaria) decided to do almost exactly that.

And then a week or so later, I discovered that my veldt fig (Ficus burtt-davyi) had followed the willow-leaf's example!

This mame F. burtt-davyi is one of my favorite bonsai. Pot by Sara Rayner.
 The orange arrow points to the root that got a response of "Yes! Where I want one!" (Or words to that effect.) I've been hoping for an aerial there for several years. I want an aerial root on this tree for the tropical look, but just one because of the tree's size. And I want it where it's readily seen, but won't compete visually with the hollow trunk. This root's placement is perfect!

I was ready to use another, older aerial (blue arrow) if necessary. I would have grafted that root to the back of the lowest branch, at the branch base, approximately where the new root is emerging. Once the graft took, I would have removed the upper section, between the graft point and the root's initiation point in the canopy. Now I won't have to do that.

Here's a closer look.

The paper-clip hook (green arrow) is there to keep an older root from crossing the end of the new aerial.
Forgive this tree's mildly disheveled look: I'm getting it cleaned up for repotting in the near future.

Meanwhile, the willow-leaf fig about which I wrote in my last post has produced the beginnings of a couple more aerials!

Besides shade and high humidity, plenty of fertilizer seems to be a requirement for initiating new aerial roots.

The blue arrow points to an emerging initiation point. Below it you can see the root I wrote about in my last post, now matured enough to have the straw removed. (You remove a straw from a new aerial the same way you defuse a bomb - very carefully.)

Some aerial roots fail, and sometimes without apparent reason. The yellow arrow above points to another aerial that got started, but was already in trouble when the picture was taken. Five days later, it has withered completely.

Since I don't want this new one to fail, I cut a new length of drinking straw to protect and guide it. This tree's size and intended design allow for more than one aerial in that area.

The point where each aerial enters the soil can be adjusted at future repottings. Once an aerial root lignifies,
it can be wired and positioned like a branch.
On the opposite side of this tree's trunk (red arrow below,) another root-initiation point has appeared. (We need a a less cumbersome term for such point. Any ideas?) I'd like to see this one develop successfully as well, so am going to give it a drinking-straw cover too.

If, like me, you endured acne as a teenager, you'll understand when I say I'm reminded of a pimple!

When I saw this picture, I thought perhaps yet another root initiation point was showing up, out on a major branch (green arrow.) But no joy there: the "bump" turned out to be nothing more than a scrap of loose bark.

I should mention that there is another way to get an aerial root at just the point you want it: graft in a seedling or rooted cutting. That takes longer, but provided the graft takes well and without much swelling, it works. I plan to use that method on a Ficus microcarpa this summer, and I'll post pictures when I do. 

Meanwhile, the tropical  trees will be in the Crate for at least two more months. Who knows how many more aerial roots may appear before spring? 

:-)  :-)  :-)

Monday, January 4, 2016

Aerial Roots, Drinking Straws and Snails

     The winter conditions that my tropical trees have in the Crate are of course different from summer conditions outdoors. The two biggest differences are that the light is less intense, tho still adequate for growth; and I keep the humidity a good deal higher. Both those factors encourage aerial roots.

If there is a consistently reliable way to induce a tree to throw an aerial root at a particular point, I don't know what it is. As a rule, the tree initiates a new aerial root somewhere that seems good to it, and the grower has to be ready to encourage and protect the ones that happen to appear where the human wants them!

For any who may not know, one common way to protect a new aerial while it extends down to the soil is to place a piece of drinking straw where the root can follow it down. This maintains high humidity right around the root and serves as a warning to the grower: "Caution! Don't bump!" Since aerial roots are very fragile until they anchor and start to lignify, such reminders are very useful.

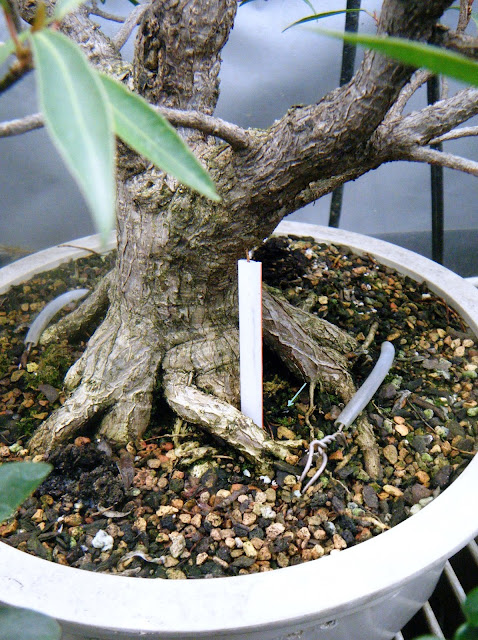
A couple of weeks ago one of my willow-leaf figs (Ficus salicaria) initiated a new aerial root very close to a point where I'd been hoping for one. I positioned a piece of drinking straw to protect and guide it, and after a few days noticed that the growing root (which has now reached the soil surface) is visible thru the plastic. I decided to take a few pictures tonite.

The aerial root shows as a somewhat indistinct dark line.

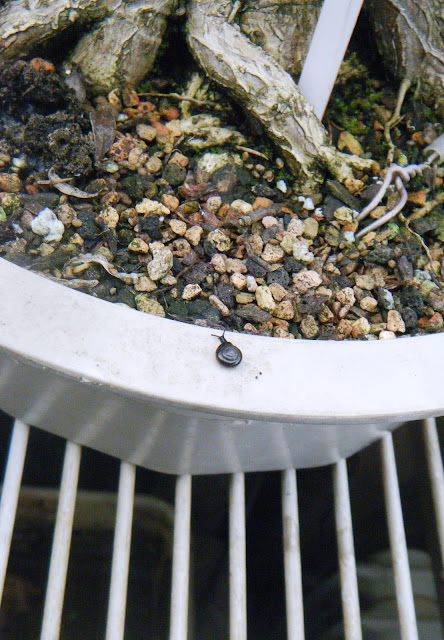
You'll notice a light-blue arrow to the right of the straw. That points to a snail; more on it in a moment.

A closer view of root, straw and snail. You can see the root's initiation point just above
the top of the straw.
This is the fifth snail of this species that I've found around the roots of this willow-leaf within the last two weeks. Snails also find the high humidity and less-intense light in the Crate congenial. But since they feed on living plant tissue as well as dead, I remove them.

This species' shells are about the same diameter as the drinking straw from McDonald's;
less than 1/4-inch (around 6 mm.)

While I disposed of another (sixth) snail I noticed, this one poked out its head and started for home. I don't know how it knew which direction to go. Perhaps it could smell the tree; perhaps it sensed the humidity in the substrate; perhaps it detected the shadows among the roots. I'm afraid it didn't get very far.

It actually looks rather elegant, all in black. But not elegant enough.

:-)  :-)  :-)

Sunday, December 27, 2015

"Oh, the weather outside is" - WEIRD!

(With apologies to Messrs. Cahn and Styne.)

   On Christmas Eve, the daytime temperature here in Warsaw set a new record high of 61° F (16° C.) On Christmas Day, the temperature got up to 55° F. The normal high this time of year in this part of the USA is 33° F, just above freezing.

Temperatures have been above average all autumn. I couldn't find certain confirmation, but I think both October and November were the warmest on record here, and December may well turn out to set a record average, too. Our first frost didn't arrive until the first half of November, a month later than usual. So far we've had exactly one - count it, one - snowfall that required me to get out the snow shovel. (It did give me a chance for a nice picture.)

Japanese maples branches flocked with snow, beside the church we attend.

There is at least one obvious and major reason for the unusual weather. There is a well-established correlation between the presence of a strong El Niño phenomenon in the eastern Pacific and milder-than-average winters across much of the USA. The present El Niño is unusually strong in many regards, which goes a long way to explain why, in spite of the calendar, we've been running around in shirtsleeves more often than jackets!

(I consider the jury to still be out on the question of atypical global warming. I'm waiting for more conclusive evidence, one way or the other.)

The unusual warmth has of course affected my trees. Buds on several of my hardy trees started to swell in early December, as if spring had arrived, and swelled enough that I became concerned! The danger, for any who don't know, was that the trees would start to actually push new growth - and then the weather would return to normal and the tender new growth be killed by freezing temperatures. If that happens, a tree has expended some of its stored reserves for nothing.

Buds swelling on a hybrid yew (Taxus x media 'Densiformis',) December 13, 2015.

I'm thankful that concern hasn't turned into reality. Most likely, I think, because of the shorter days as the winter solstice approached, the buds have stopped swelling and the trees appear to have gone into dormancy. I was glad to see the needles on my yamadori ponderosa turn to their normal winter shade.

This lighter green is normal for ponderosa needles in winter.
Normally, my tropical trees are settled in the Crate by mid-to-late October. This year, I moved them into their winter quarters on November 28th. (With some incredulous shaking of my head at the late date.) I had been doing the "tropical two-step" with them for a couple of weeks by then, moving them indoors overnite when the lows fell into the upper 30's F, then back outside during the day. With daytime temperatures often in the 50's F, I wanted to give them the advantages of natural sunlight for as long as I could. But by the 28th, enough was enough.

And sometime in the next couple of weeks my half-hardy trees will be moved into the mudroom, and the hardy trees will go under their rack in the side yard.

The long-term forecasts call for above-average temperatures for the rest of the winter. In view of that, I've considered leaving my hardy trees out and just making sure they were protected from hungry and inquisitive critters. But a recent blog post by Michael Hagedorn on winter chilling requirements led me to change my mind.

The gist of what Hagedorn says is this (unless I missed something.)

  1. Plants that are native to the earth's temperate and cold zones need a certain amount of winter chilling, measured in hours at temperatures between 33° and 50° F (.5° and 10° C.) Winter-chill requirements vary by species.
  2. If a plant doesn't get the hours of chilling that it needs, its growth the next season will be affected; some species won't break dormancy until their chill requirements are met.
  3. Temperatures below freezing don't count on the plant's internal chill clock. (I have no idea why that might be.)


Once my hardy trees are  under the rack, they won't be as much affected by temporary temperature spikes that would interrupt their chilling requirements. So when spring does come, they'll be more likely to break dormancy on something approaching a normal schedule, and then grow well next season. The fabric that covers the rack will also serve to break the wind, and will hold in the fumes of the mothballs I use to discourage chipmunks, squirrels, and other cute-but-destructive little scoundrels.

To see Michael Hagedorn's post on hardiness and winter chilling for yourself, please click here. The post is thoughtful and well-written, and I recommend it.

:-)  :-)  :-)

Monday, November 30, 2015

Trunk-Fusion Project: A Progress Report

     One of our club activities last winter was a mini-workshop on trunk fusion. For any who don't know, this technique involves binding together some young and thin whips - however many you like - and forcing them to grow together to form a single thicker trunk. It's used primarily with vigorous, fast-growing species like trident maple (Acer buergeranum,) schefflera, and many species of Ficus.

For our mini-workshop, I used four rooted cuttings of Ficus microcarpa 'Tigerbark ,' of various thicknesses; the thickest was about the girth of a standard pencil. Some people use plastic wrap to bind the component trees together; I prefer zip ties. One bonsai master I know uses both, with the ties over the plastic. Whatever you use, the important properties of a binding material are, first, that it allow the bark to breathe; and, second, that it not stretch: the idea is to force the trunks together so they fuse.

The brown represents the trunks, the black the wire.
I enclosed something else within the bundle of trunks: a length of aluminum wire with a loop at one end, longer than all but the largest of the rooted cuttings. This sketch gives you the basic idea:

This is an experiment. The idea is that an anchor wire can be threaded thru the loop from below, and hold the tree in the pot without showing on the soil surface. It remains to be seen whether such a setup will adequately keep the tree from wobbling in the pot once its roots are re-established.

The upper length of the wire, starting from where it emerged from the bundle of trunks, was used to give some shape to the upper part of the primary trunk.

I meant for the wire to be in the center of the bundle, but the shapes of the trunks were such that it was forced to one side and partly exposed. However, given the vigor with which F. microcarpa grows, I expect the wire to be hidden within a couple of years.

And this tree has lived up to its variety's reputation: I had to replace the ties twice during the summer, when they began to bite too deeply into the bark! I replaced them a third time tonite, and decided to take some pictures.

Before work began. You can see how much the primary trunk has outstripped the other three.
I picked up the green ties at a garden center outside Suí an Róin, Co. Offaly.
The tree has been trimmed, and one of the old ties has been cut. You can see
the wire showing here and there along the left side of the partly-fused trunk.
Usually I try to have a new tie in place before I cut the ones above and below it. Ties are pulled snug.
The wire was cut off the upper part of the main trunk earlier this year.
Tonite I removed most of  the wire visible in this picture. 
A new set of zip ties is in place. The blue arrows indicate the length of wire that was removed tonite.
The rest will remain permanently embedded in the tree.
Trimmed, re-zipped, and settled in the Crate for the winter. Please forgive the somewhat blurry area near the base
of the trunk: a drop of water may have gotten on the lens. But of my "after" pictures, this gives the best view of the work.
As you've seen, the ties have left rings of obvious constriction on the trunk. But given the speed with which this fig grows, I expect those to grow out and disappear within a few years. By the beginning of next summer I expect the trunks to have fused together enough that ties will no longer be needed.

My provisional long-term plan for this tree is a modified broom with a broad, spreading canopy, probably with aerial roots dropping to the soil.

Sooner of later, I want to try this technique with another fast-growing species, this one temperate: bald cypress. I'll be sure to take pictures when I do.

:-)  :-)  :-)